Start with transparent artwork.
A gang sheet places several transfer designs on one large canvas. Before uploading, ask your shop for its usable roll width, margins, minimum gaps, accepted file formats and maximum length. Also confirm whether it accepts multiple shorter sheets.
This version accepts PNG files under 20 MB, up to 20 megapixels and 12,000 px per side. Keep the original high-resolution artwork. Changing a “DPI” label or enlarging a small image does not recover detail.

Try 4 × 4 in, quantity 6.Download PNG ↓
Try 7 × 3 in, quantity 2.Download PNG ↓
These sample designs were created for PrintCraft. You may use them to test the tool. They are not customer artwork.
Choose a size the pixels can support.
Add your PNGs. Set each design’s printed width; the height follows its proportions. Use the DTF size chart as a starting point, then measure your real garment.
The Bloom sample at 4 in is 300 PPI. At 8 in it is 150 PPI. The low-resolution test file is 300 × 150 pixels: at 10 × 5 in it is only 30 PPI. A 300 PPI export canvas does not fix that source.
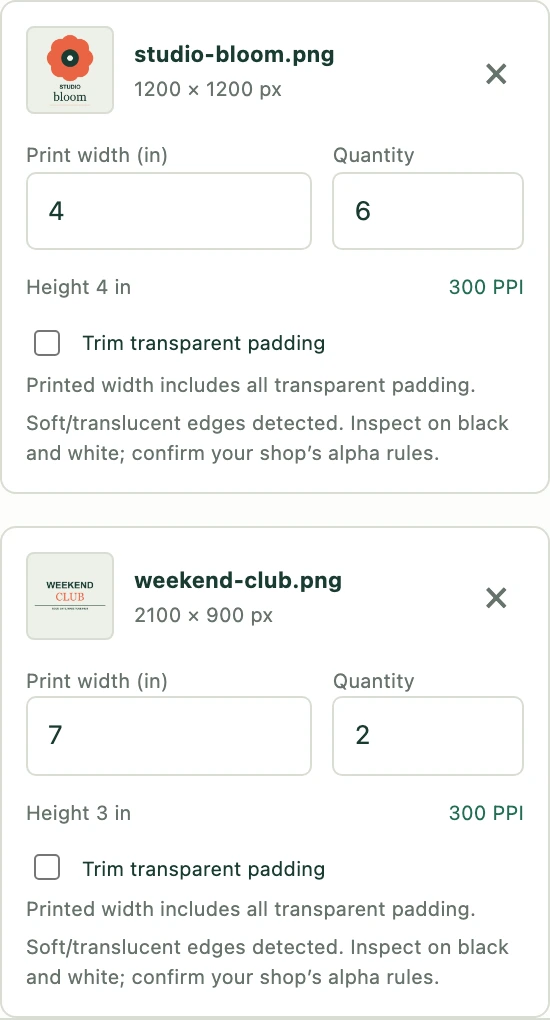
By default, print width measures the entire PNG canvas. Turning on “Trim transparent padding” makes it measure the visible cropped artwork. The width stays fixed, while height and PPI are recalculated. Inspect semi-transparent edges on both light and dark backgrounds.
Arrange the batch you actually need.
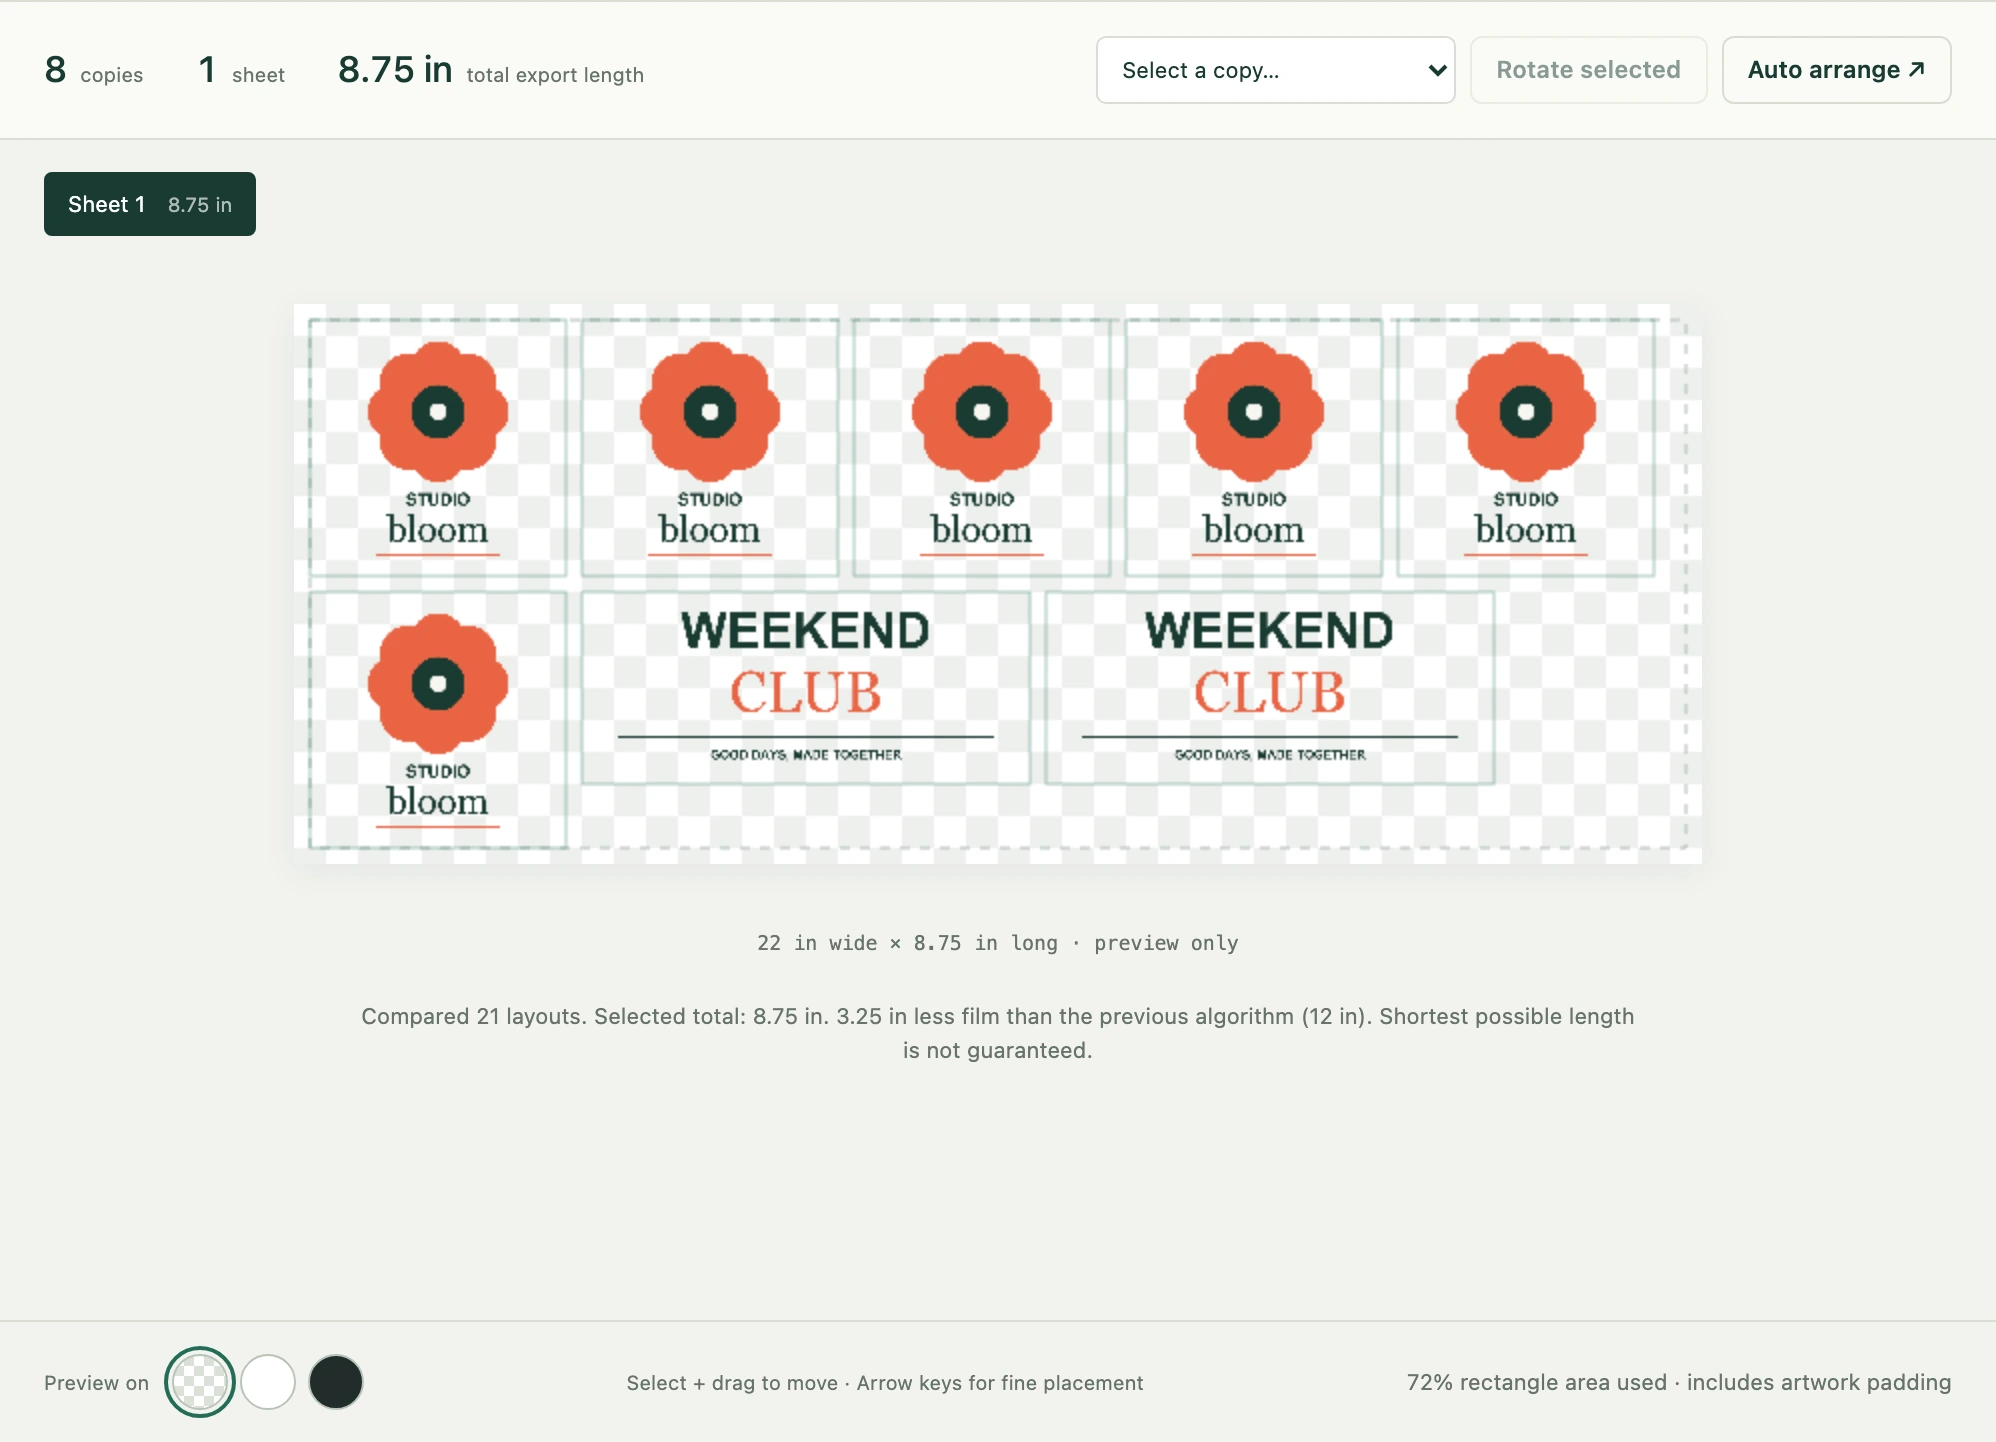
Set Bloom to 6 copies and Weekend to 2 copies. Enter the shop’s roll width, maximum sheet length, margins and gaps. The default 22 in roll and 0.25 in spacing are editable conveniences, not industry rules.
Auto arrange compares 21 shelf and free-rectangle layouts and chooses the shortest total film length among complete, checked candidates. The eight-copy sample now uses 8.75 in instead of the previous 12 in, with the same margins and gaps. Rotation can help a copy fit; the result is not guaranteed to use the least possible film. Click a copy (or use the copy selector) to select it, drag to move it, or use arrow keys for 0.01 in adjustments (Shift + arrow moves 0.25 in). “Rotate selected” turns that copy 90°.
Choose “Fixed shop length” in the builder, then enter “Shop sheet length” in your current units. A 22 × 12 in product needs a 22 × 12 in PNG canvas. Every sheet uses that length, including the last one; unused space is transparent. Set roll width to the purchased width too. Changing the length rearranges the batch and may split it into more sheets. Switching export modes alone keeps your sizes and positions.
In this mode Auto arrange prioritizes fewer sheets, then shorter used length. The preview shows the entire exported canvas. “Trim to layout” returns to the actual used length, including margins. Both modes are limited to 24 × 24 in per sheet.
The beta supports 24 × 24 in at most per sheet, 200 copies per job and 10 sheets. Longer jobs are split. Review each sheet tab, and get your shop’s agreement before uploading separate files.
Count the copies. Check the detail.
For low-resolution artwork, “Use … width for 300 PPI” reduces the physical size using the original pixels. Check that the smaller print still works on your garment. The review table compares requested and placed counts, lists each design’s unrotated printed width and height, and shows effective source PPI. The tool also checks sheet limits, margins, overlap and minimum gaps after manual moves.
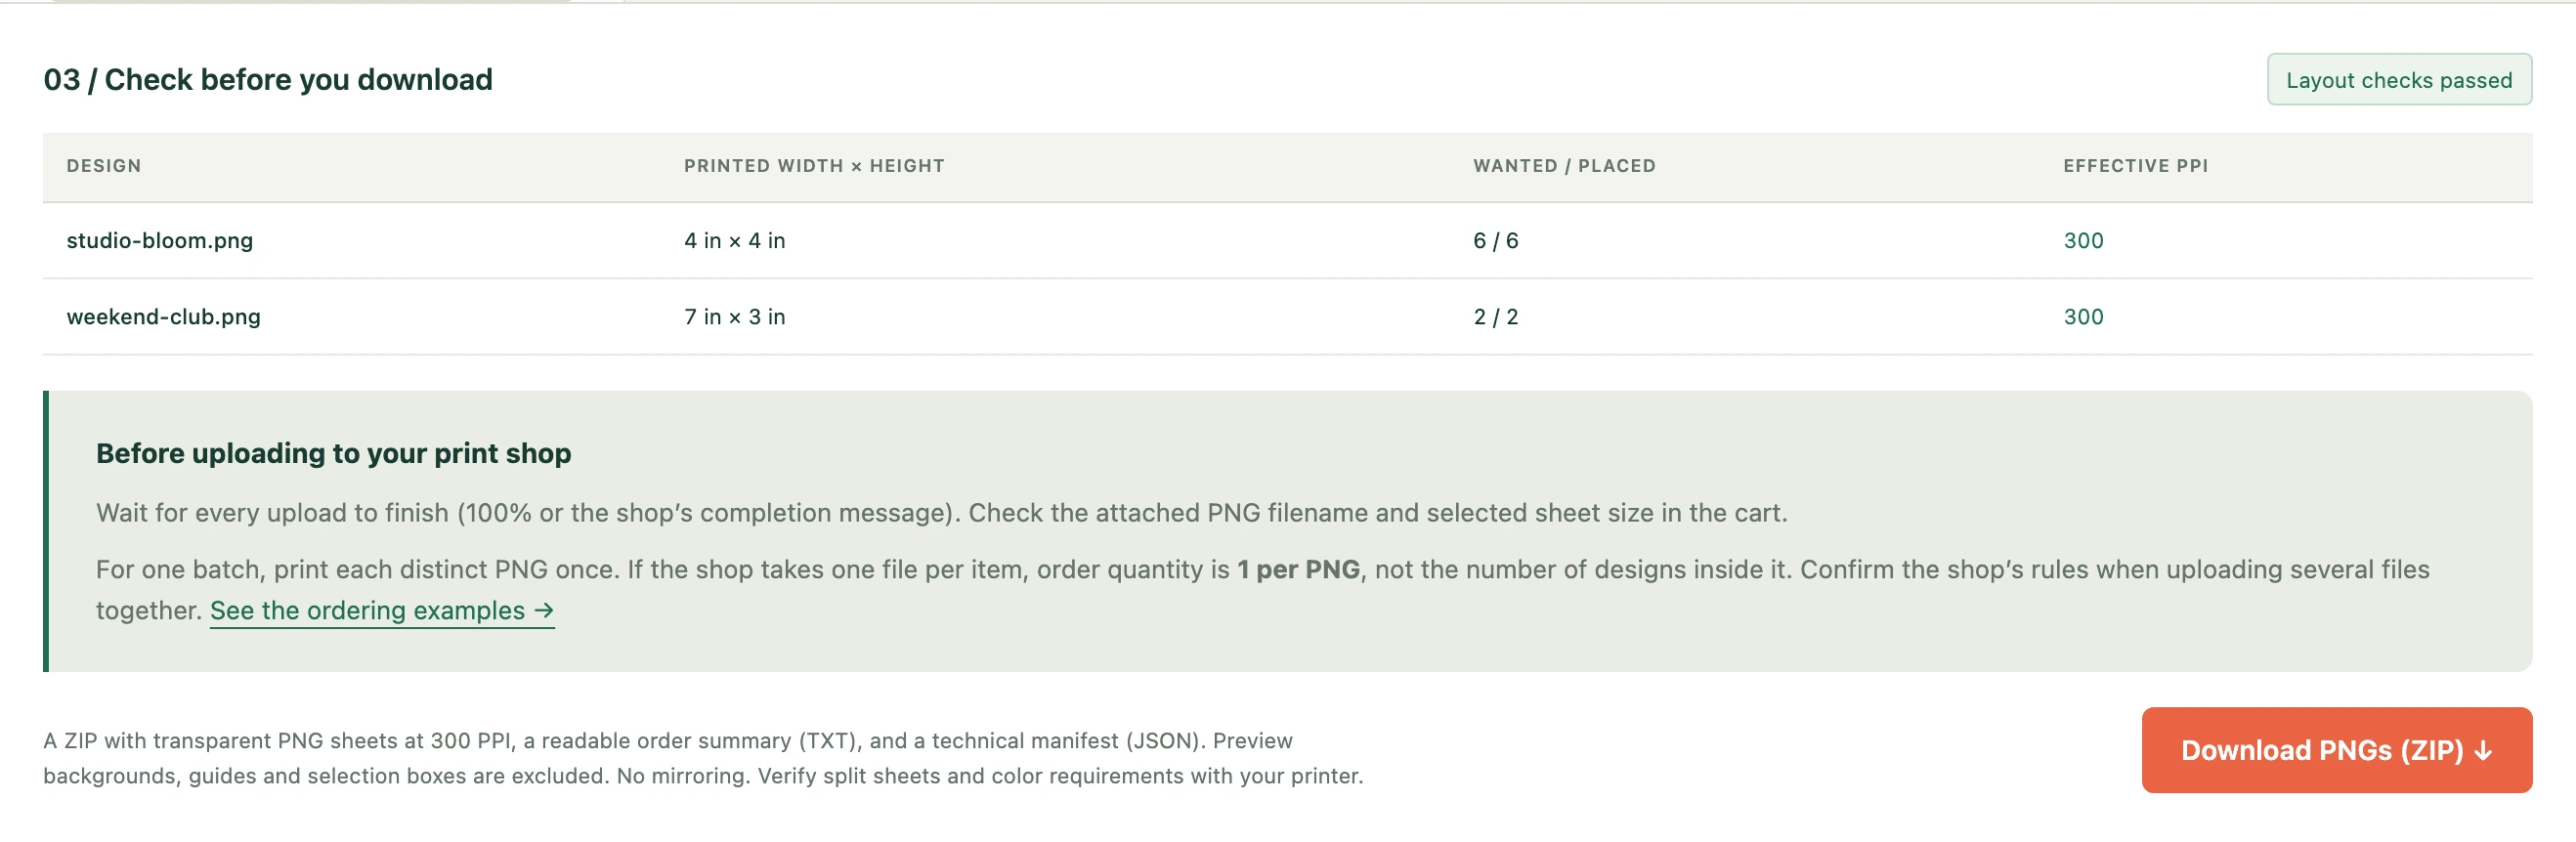
- Geometry errors: fix the placement or press Auto arrange to reset it.
- Below 300 PPI: choose a smaller print or a better source image. You may acknowledge the warning to export the requested size.
- Solid background: this version flags missing transparency; it does not remove white backgrounds.
- Semi-transparent pixels: antialiasing and translucent artwork need your printer’s guidance.
Download, unzip, then confirm.
Download the ZIP. It contains a transparent PNG for every sheet, a readable printcraft-order-summary.txt with dimensions and copy counts, and a technical printcraft-job.json manifest with placement coordinates. Send the PNG files to the print shop; the text files are reference notes, not artwork.
The PNG pixel dimensions are the physical size × 300, rounded up to the next pixel. A 22 × 24 in sheet is 6,600 × 7,200 pixels. The PNG also includes 300 PPI resolution metadata (some applications call this DPI). Some uploaders ignore that metadata, so always verify the imported physical dimensions.
Download the actual eight-copy example ZIP ↓ to inspect a real export before making your own.
- Open the exported PNG on light and dark backgrounds.
- Confirm width, length, design proportions and copy counts.
- Ask the shop to confirm its color, transparency and file requirements.
- Check a small printed sample before a production batch.
It does not create a white-ink layer, apply an ICC profile, or guarantee supplier acceptance. Color and print settings belong to the print shop’s workflow. Large exports need memory; use a desktop browser and keep this tab open.
Finish the upload. Order the right number of sheets.
- Select a product whose width and length match the exported PNG. Check the imported physical dimensions even if the uploader reads the 300 DPI metadata.
- Upload the sheet PNG, not its ZIP, preview screenshot or summary text. Keep the uploader open until every file reaches 100% or shows its completion message. A preview appearing does not always mean the upload is finished.
- For different PNG sheets, attach one file to each item and set each item’s quantity to 1 for one complete batch, when the shop supports this workflow. If its uploader combines several files in one item, confirm how quantity applies before proceeding.
- Check the cart: every item must have the correct PNG filename, sheet size and purchase quantity. An item without an attachment is incomplete even if it has a price.
- Review shipping, tax and the total before paying. Check a small printed sample before a production batch.
| Your PNG files | Design copies inside | Shop quantity for one batch |
|---|---|---|
| 1 left-chest sheet | 10 logos on one PNG | 1 for that PNG, not 10 |
| 1 mixed-size sheet | 5 designs on one PNG | 1 for that PNG, not 5 |
| 3 different sheets | 4 designs each; 12 total | 3 separate items, each quantity 1 |
These examples assume the shop sells one uploaded PNG per item. Ordering a second complete batch means printing each file twice; it doubles every design count. Always confirm a shop’s multi-file rules.
Come back to your draft.
Original PNGs, sizes, quantities, units, sheet rules, export length mode and manual positions autosave in this browser. Wait for “Draft saved” before refreshing or closing. Returning to this builder restores the last saved job; low-resolution warnings must be reviewed again.
“Save draft now” saves immediately. “Clear this job” also clears the saved job, with a 15-second undo while this tab remains open. “Delete saved draft” removes only the stored copy and pauses autosave; the open workspace stays available to download. Private browsing, cleared browser data or unavailable storage can prevent recovery. A visible failure message means the draft is not saved.
If another tab changes the saved job, autosave pauses rather than overwriting it. Reload to restore that version, or choose “Replace saved draft” to save this workspace instead.
When something doesn’t fit.
One design is too wide: check usable width after side margins. Enable rotation if the other direction fits, or confirm a smaller print size. Avoid squeezing the artwork disproportionately.
The length is unexpectedly large: check quantities and heights. Automatic packing is a heuristic; separate big and small designs or adjust positions manually. The total length includes each exported sheet’s top and bottom margins. Manual moves recalculate the used length after the move. Fixed shop length keeps the full selected canvas, so empty space does not reduce the length you purchase.
The export fails: shorten the maximum sheet length or reduce the batch. The 24 × 24 in limit bounds canvas size, but available memory varies by device and browser.